ZenDyn
Important:
ZenDyn is a standalone product and is animation blueprint based. In order for it to function correctly, it changes your Metahumans default Face animation PostProcess blueprint at runtime. This can create conflicts with other components attached to your Metahuman such as ZenBlink, that also set their own facial animation PostProcess Blueprint. It is advised to use ZenDyn independently from these other products, as integration requires skills and experience that are beyond the scope of these setup instructions.
Setup Instructions
- Prepare the Project:
- Add a MetaHuman to your scene.
- Enable the Plugin:
- Go to Edit > Plugins.
- Search for ZenDyn and enable it.
- Restart Unreal Engine to activate the plugin.
- Access ZenDyn Content:
- Enable Engine Content and Plugin Content in the Content Browser settings.
- Search for ‘ZenDyn‘ in the Content Browser to view all plugin-related content.
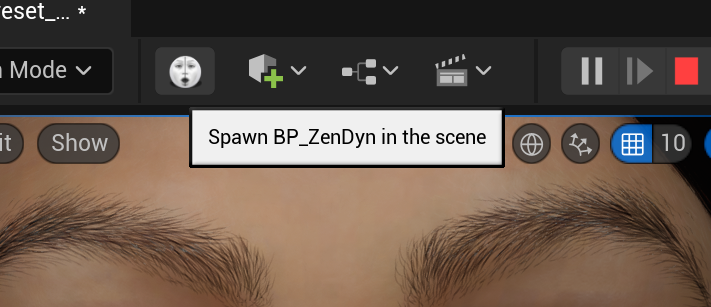
- Option 1: Click the quick add icon on the Level Editor Toolbar to Spawn ZenDyn in the scene.
- ( version 1.2.0 and above only )
- Option 2: Add ZenDyn World Actor:
- Drag the included Example BP_ZenDyn blueprint into the scene. ( The blueprint is located in the plugin Content folder, you may need to enable “show plugin content’ in the content browser)
- Zero out its transform.
- Alternatively, use Quick Add to add the blueprint by typing and searching for ‘ZenDyn.‘
- Option 2: Add ZenDyn Actor Component:
- Select your Metahuman Actor in the Outliner
- In the Details Panel click the “Add” button
- Search for “ZenDyn” to attach the included Actor Component.
Usage:
Use in Sequencer:
- Create a Level Sequence and add your Metahuman.
- Add an existing facial animation to your Metahumans “Face” animation track in sequencer.
- Option: Use LiveLink Live animation *instead of existing animation.
- *There is a bug in some engine versions that may cause a crash, If you use both LiveLink and Existing animation in sequencer at the same time.
- Select ZenDyn in the Details panel and click the “Add Keyframe” icon to add a keyframe to sequencer for the selected property. Example: “Brows”, “Brows Smoothing”
Results:
- Simulate or Play to view results.
- Note: You cannot adjust properties of the ZenDyn Actor Component in the details panel during P.I.E. This is a limitation of the UnrealEngine Editor. You can change the properties in sequencer or programatically. This is why the preferred Method is to use the ZenDyn World Actor Instead.
Baking:
You can bake ZenDyn animations in take recorder as you would Live link.
A YouTube tutorial is here:
https://youtu.be/gGTP-p0QOnI?si=f_ZQxUr8K-Km-kJU: ZenDynUse Programmatically (Advanced):
- You can utilise and access the public variables of the ZenDyn Actor Component by adding the component to your Metahuman blueprint and then referencing it.
Use Details Panel:
- Adjust Default properties in details Panel
- Note: You cannot adjust properties of the ZenDyn Actor Component in the details panel during P.I.E. This is a limitation of the UnrealEngine Editor. You can change the properties in sequencer or programatically or before you press play/simulate.
Character:
Metahuman:
- Here is where you choose your Metahuman Actor that you want ZenDyn to use.
Head Mesh Name:
- Choose your head skeletal mesh name here.
- By default Metahumans use “Face” as the mesh name.
Control And Smoothing:
These sliders control the strength/weight and Smoothing of the animation.
Each facial group has various default controls the current available groups are:
- Brows
- Eyes
- Nose
- Cheeks
- Mouth
- Jaw
Control:
- Control: You can Reduce or Boost animation for each group by adjusting these properties 0 (Disabled/Reduced) , 3 (Boost/Max).
Smoothing:
- Smoothing: You can also control the amount of smoothing 1 is none and 100 is maximum.
Dynamics:
These properties control the dynamics of the facial animation. You can add “Wiggle” to facial animation groups Brows, Nose and Cheeks. For each group it is possible to adjust Dynamics Enable, Strength, Acceleration, Damping, Frequency.
- Use Dynamics: Enables Dynamics “wiggle effect” for the chosen facial group.
- Wiggle Strength: Controls the weight of the effect.
- Wiggle Smoothing: 1-100 (1 is disabled, 100 is maximum) ,
- Adds smoothing (interpolation) to the facial group. This is helpful in removing “jitter” from existing noisy facial animation.
- Wiggle Frequency: The time in seconds between effects.
Face:
Use this section to control Facial Animation:
- Use Breathing: Enables or Disables the Breathing effect
- Breath Strength: Strength of the breathing effect
- Breath Speed: The speed of the breathing effect
–
- Use Emotion : Enables or Disables the Emotion Pose
- Emotion: Select a predefined Emotion Pose
- Emotion Strength: The strength of the Emotion Pose
- Emotion Switch Speed: The speed emotions switch
- Emotion Blend Type: The type of Blending used to blend Emotion with existing animation.
–
Eyes:
Use this section to Control Eyes:
- Micro Saccadic Enable: Enables or Disables the Saccadic effect
- Micro Saccadic Weight: Strength of the Saccadic effect (Left Right/Up Down)
- Micro Saccadic Speed: The speed of the Saccadic effect (Left Right/Up Down)
- Generate Blinks: Enable or Disable basic Auto Blink
- Blink Interval: The interval between blinks
- Blink Smoothing: Control to smoothing blinks.
- Enable LiveLink Eye Fix: Use this if you experience problems with eye movement while using LiveLink
Global:
Use this section to control Global proprieties:
- Global Control: Overall Animation strength
- ZenDyn Enabled: Global Enable/Disable
- Zen Dyn Curves: A Data Asset that contains the curves used for Control and Smoothing.
- LiveLink Mode: Choose Metahuman Animator or Legacy. Legacy is ARKit. (v1.2.2+)
- ZenDyn Debug Enabled: Global Debug Enable/Disable