ZenBlink
UnrealEngine Setup v2.5
Important :
ZenBlink is a standalone product and is animation blueprint based. In order for it to function correctly, it changes your Metahumans default Face animation PostProcess blueprint at runtime. This can create conflicts with other components attached to your Metahuman such as ZenDyn, that also set their own facial animation PostProcess Blueprint. It is advised to use ZenBlink independently from these other products, as integration requires skills and experience that are beyond the scope of these setup instructions.
Setup Instructions
- Prepare the Project:
- Add a MetaHuman to your scene.
- Add a Cine Camera to the scene.
- Enable the Plugin:
- Go to Edit > Plugins.
- Search for ZenBlink and enable it.
- Restart Unreal Engine to activate the plugin.
- Access ZenBlink Content:
- Enable Engine Content and Plugin Content in the Content Browser settings.
- Search for ‘ZenBlink’ in the Content Browser to view all plugin-related content.
- Option1: Add ZenBlink World Actor from the Level Editor Toolbar (v2.5.4 and above)
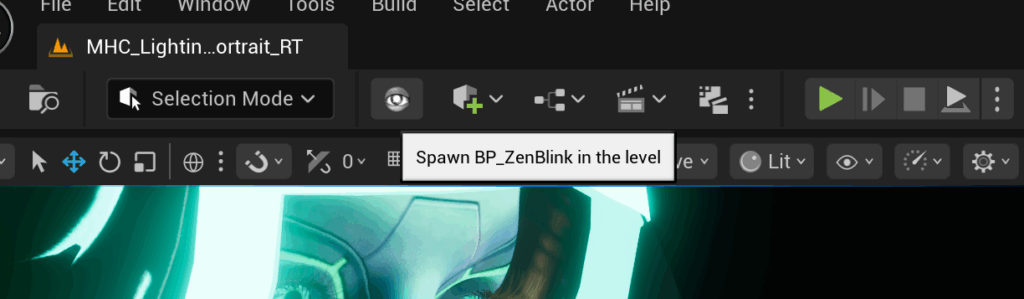
Click the ZenBlink icon to add the world actor to your scene
- Option 2: Add ZenBlink World Actor:
- Drag the included Example BP_ZenBlink blueprint into the scene. ( The blueprint is located in the plugin Content folder, you may need to enable “show plugin content’ in the content browser)
- Zero out its transform.
- Alternatively, use Quick Add to add the blueprint by typing and searching for ‘ZenBlink.’
- Option 3: Add ZenBlink Actor Component:
- Select your Metahuman Actor in the Outliner
- In the Details Panel click the “Add” button
- Search for “ZenBlink” to attach the included Actor Component.
ZenBlink Defaults
ZenBlink default properties
Metahuman
Metahuman: Assign the Metahuman actor that will be animated in the scene.
(only available for ZenBlink World Actor)
Camera Focus
Auto Focus: Turn camera autofocus on or off.
Camera Focus Target: Actor that the camera should focus on. Must be a blank actor.
Auto Focus Adjustment: Adjust the focus point manually with a 3D vector.
Mode
There are 3 Modes: None, Random, Follow Target
Random
Random: ZenBlink Generates Random Head and Eye Movement.
Movement Speed: The speed of movement in Random mode.
Follow Target
Follow Target: The Metahuman Characters Head/Eyes Follow the defined actor.
Target To Follow: The actor that the system should follow during animation.
Target Distance Offset: Fine tune the forward distance to the target.
Eyes
Auto Blink: Enable or disable procedural blinking behaviour.
Auto Blink Speed: The interval between blinks.
Auto Blink Amplitude: Amplitude of Blinks. (how much the eyelids close)
–
Use Eye Movement: Enable or Disable Eye movement
Eye Movement Interpolation Speed: Speed of eye rotation smoothing (0–50).
Eye Aim Adjustment: Manual offset adjustment to tweak where the eyes focus.
–
Micro Saccadic Enable: Enable small, realistic eye jitter for realism.
Micro Saccadic Speed: Speed of left-right and up-down micro saccadic motion (0–10).
Micro Saccadic Strength: Strength of micro saccadic movement (0–50).
–
Use Baked Eye Movement: Use baked ZenBlink animation for eye movement
Head
Use Head Movement: Enables procedural head motion during animation.
Head Movement Strength: Controls the intensity of head movement (0–1).
Head Movement Blend: Blends between existing and ZenBlink movement (0–1).
Head Movement Interpolation Speed: Smoothing speed for head movement (0–50).
–
Use Baked Head Movement: Use baked animation curves for head motion.
Baked Curve Mode: Default or ARKit. The type of curve to use for baked animation.
Face
Face Animation: Toggle facial animation system on or off.
Face Emotion Strength: Controls the emotional intensity in facial expressions (0–1).
Face Animation Blend: Blend between default slot and ZenBlink animation system (0–1).
Face Blend Mode: The type of blending used to layer facial animation.
–
Emotion: Set the facial emotion pose of the character.
Emotion Blend Speed: Speed of transitioning between emotions (in seconds).
–
Use Idle: Enable idle animations.
Idle Strength: The strength of idle animations.
Idle Blend Mode: The type of blending used for blending Idle animations.
–
Use Breathing: Enable or disable breathing simulation.
Breathing Strength: The strength of the breathing simulation.
Breathing Speed: The speed of the breathing simulation.
Global
ZenBlink Strength: Master strength value controlling all ZenBlink procedural effects (0–1).
Use ZenBlink PostProcess: *Enable/Disable ZenBlink’s custom post-processing (UE 5.5+ only).
*Warning: Advance Usage Only – ZenBlink requires this post process in v2.2.4+, unchecking this parameter reverts to legacy animation blueprint method, this can break new functionality in U.E 5.6+
Live Link Mode: Here you can define the LiveLink pipeline, Legacy ARKit or Metahuman Animator. (v2.5.7+)
Debug: Enable advanced debug logging for the animation instance.
ZenBlink Internals (Advanced)
Is Updating: Internal flag used during runtime updates.
Body Mesh Name: Name used to identify the body mesh (default: “Body”).
Face Mesh Name: Name used to identify the face mesh (default: “Face”).
Is Setup Completed: Internal setup flag indicating whether initialization is done.
Metahuman Animation Blueprint: Pointer to the Metahuman animation blueprint class.
ZenBlink Animation BP: ZenBlink-specific animation blueprint used for procedural behavior.
Internal Face Anim Class: Internal reference to the face animation class.
Focus Target 1: First bone name used for eye targeting (e.g., FACIAL_L_Pupil).
Focus Target 2: Second bone name used for eye targeting (e.g., FACIAL_R_Pupil).
Current Actor: Runtime reference to the actor currently being controlled.
Face Mesh: Reference to the face mesh component (skeletal mesh).
Body Mesh: Reference to the body mesh component (skeletal mesh).
Settings BP: ZenBlink system settings defined in Blueprint.
LookAt Settings BP: Look-at control settings for eye targeting.
ZenBlink Post Process BP: Animation blueprint class for post-process animation.
Zen Interface Class: Interface used by ZenBlink to communicate with external systems.
Using ZenBlink Features:
- Simulate ZenBlink:
- Hit simulate to observe automatic blinking, eye movement, pupil constriction, and head movement.
- Example: Set the emotion to ‘Childish’ for faster movements.
- Be aware that due to limitations of UnrealEngine, the actor component version of ZenBlink can not have default properties changed from the details panel during P.I.E.
- Auto Focus with Camera:
- Open your Cine Camera settings.
- In Focus Settings, Enable Tracking and assign the ‘FocusForCamera’ actor or the actor you created.
- Adjust “Auto Focus Adjustment” for precise results.
- Use ZenBlink with Sequencer:
- Create a Level Sequence (e.g., ‘ZenBlinkSequence’) and set frames (e.g., 500).
- Add your camera and ZenBlink World Actor (or ZenBlink Actor Component ) to the sequence.
- Keyframe properties such as Emotion, Eye Movement Type, and Weight.
- Add movement to the camera and simulate to make the MetaHuman track the camera with its eyes and head.
- Combine with Existing Animations:
- ZenBlink integrates with face and body animations.
- Note: Enabling Use Head Movement may override head animations in your sequence.
- Record ZenBlink Animations:
- Use the record button in Sequencer or Take Recorder to capture ZenBlink animations.
- Locate the recorded animation in the Content Browser and adjust its properties as needed.